- Create a folder on your local desktop named DMS.
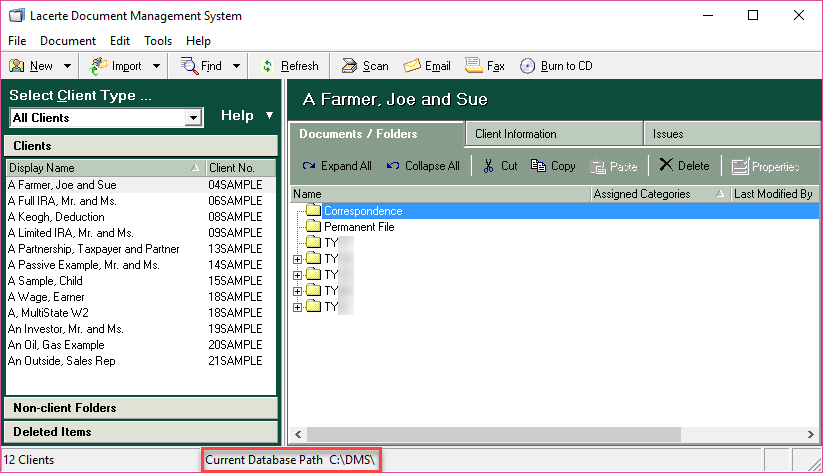
- Open the DMS program and make note of the Current Database Path shown at the bottom.
- Have all users close out of DMS.
- Open File Explorer and browse to the noted path.
- Highlight all DATA, Locks, Refresh, and Users files and copy then paste them into the DMS folder you created on your desktop.
- Browse to C:\Program Files (x86)\Intuit\DMS in File Explorer and double click on DBRepair.exe (or DBRepair as it will be shown if known extensions are hidden).
- Click OK to close the Information pop-up then click Browse and double click on Desktop.
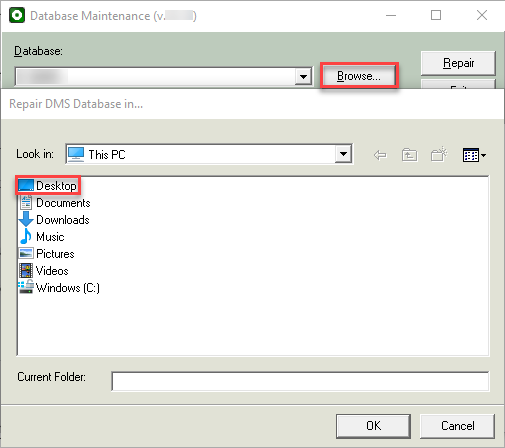
- Highlight the DMS folder then click OK.
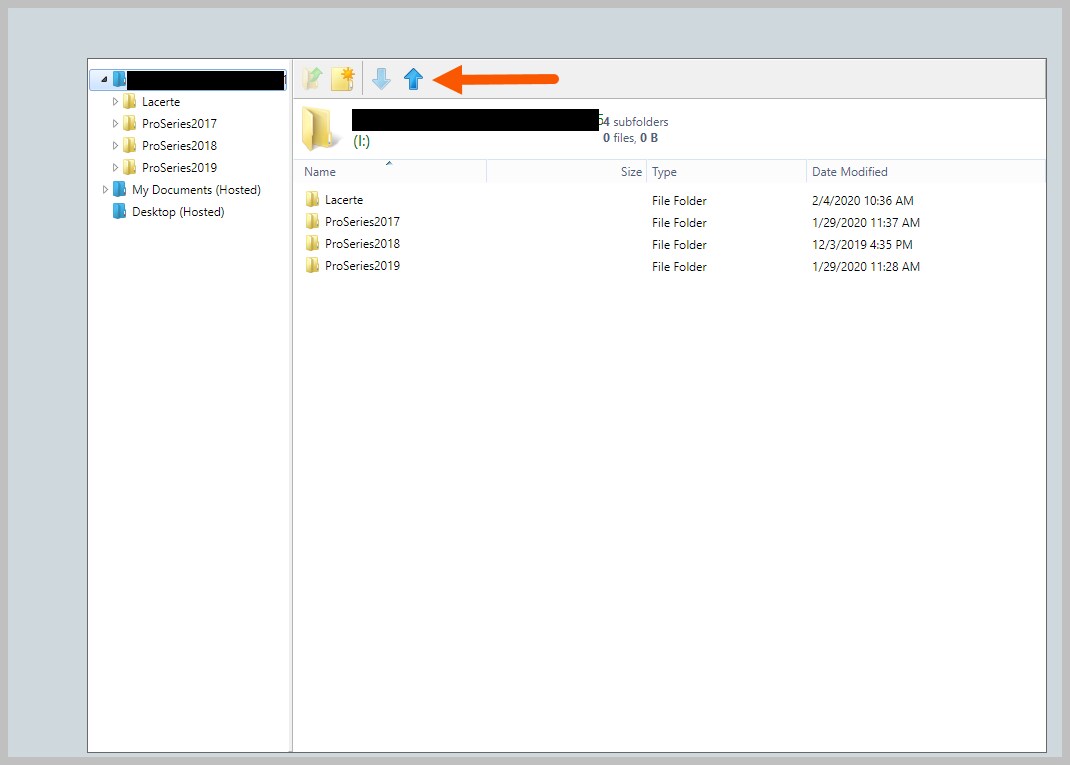
- Once the repair completes copy and paste the DMS folder from your local desktop into the I drive in the Right Networks environment (it can be zipped if needed but the file size is normally small enough that it can just be copied and pasted).
Intuit Help
Intuit
11-23-2020
04:22 PM
- Mark as New
- Bookmark
- Subscribe
- Permalink
- Report Inappropriate Content
Help Articles
Before you start:
- The end-to-end process for onboarding a DMS database is considerably lengthy. It is normal for the process to take several days. During this time, it is important that you and your users do not use DMS for anything other than viewing documents that are already stored in DMS.
- It is important to run a Database Repair in case there are any issues with your DMS Database.
- Since repairing the database can take hours it can save a lot of time if you start zipping up the Detail folder while the Database Repair is running.
Run a Database Repair
Zipping
![]() If your DMS Database is on a server it can save a lot of time if the files are zipped from the server itself. Remote into the server if possible to run the zipping process.
If your DMS Database is on a server it can save a lot of time if the files are zipped from the server itself. Remote into the server if possible to run the zipping process.
- Open the DMS program and make note of the Current Database Path shown at the bottom.
- Have all users close out of DMS.
- Open File Explorer and browse to the noted path.
- If you skipped the steps to Run a Database Repair above, when you browse to the last folder in the path do not open that folder since you will be zipping up this entire folder.
- If you have started the steps to Run a Database Repair open the last folder in the path since you will be zipping up the Detail folder inside.
- Right click on the folder you will be zipping then hover your mouse over Send to and click on Compressed (zipped) folder.

![]() Zipping may take a very long time, during this time make sure that your computer does not power off or go to sleep as this will interrupt the process.
Zipping may take a very long time, during this time make sure that your computer does not power off or go to sleep as this will interrupt the process.
Uploading your zipped folder
![]() It is recommended to use a Hard-Wired Internet Connection. Avoid running background applications that use large amounts of internet bandwidth during the upload.
It is recommended to use a Hard-Wired Internet Connection. Avoid running background applications that use large amounts of internet bandwidth during the upload.
- Click here to open the Right Networks File Manager. After logging in, click on your (I:) drive on the left side of the page.
- Click on the blue Upload ↑ button near the top of the page.
- On the Upload Files screen click Add...

- Browse to and highlight your zipped folder then click Open near the bottom right of the page.
- Click Upload.
- Once the upload is complete, you can click the Log Off button in the upper-right corner if additional files do not need to be uploaded at this time.
Errors during upload or upload failed
![]() Errors received during uploading or the upload failing are due to connection instability.
Errors received during uploading or the upload failing are due to connection instability.
![]() Before you begin: these steps require 3rd Party Software to be installed on your computer. Please click here for more information on this program before installing. If your DMS Database is on a server it can save a lot of time if the files are zipped from the server itself. Remote into the server if possible to download 7-Zip and run the zipping process.
Before you begin: these steps require 3rd Party Software to be installed on your computer. Please click here for more information on this program before installing. If your DMS Database is on a server it can save a lot of time if the files are zipped from the server itself. Remote into the server if possible to download 7-Zip and run the zipping process.
- Click here to download 7 Zip installer.
- Run 7z1900-x64.exe.
- After clicking the link above, this will usually been seen at the bottom left of your internet browser screen or in your Downloads folder. You can also use Ctrl+J to open the Downloads window in your internet browser.
- On the 7-Zip 19.00 (x64) Setup window, leave the default location for your Destination folder then click the Install button.
- When the green bar reaches the end it will tell you 7-Zip 19.00 (x64) is installed, click the Close button.
- Use File Explorer to browse to your DMS Database.
- See steps 1-3 in the Zipping section for detailed instructions. You will be re-zipping the same folder as in those steps but this time using 7-Zip to create smaller, easier to upload zipped files.
- Right click on the folder you will be zipping then hover your mouse over 7-Zip and choose Add to archive…
- Click on the Archive format drop-down and select zip if not already selected.
- Near the bottom left, click on the Split to volumes drop-down and select 1000M.
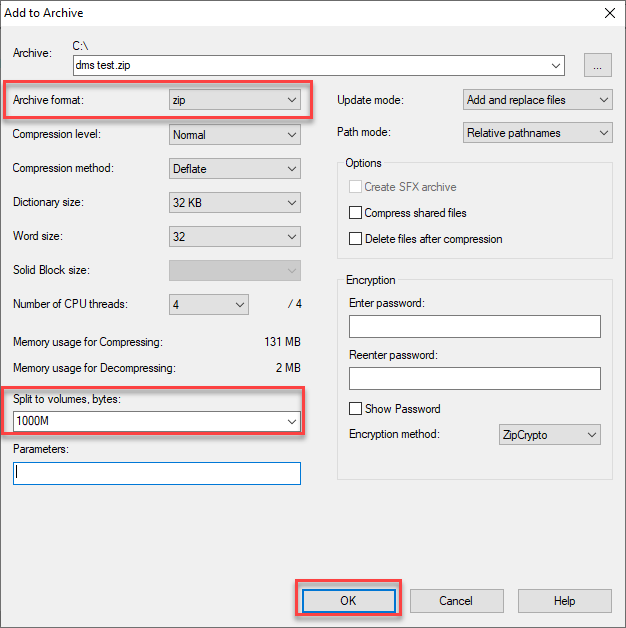
- Click OK. You will see a progress window displaying the status. This will take some time, depending on the size of the folder.
- After this completes you will see the smaller zip files in the same location as the original folder (*.zip.001, *.zip.002, *.zip.003, etc where * is the name of the original folder)
- Upload all of these zip files created by 7-Zip. Refer to the Uploading your zipped folder section above for detailed instructions. If the process fails, take note of the last file that successfully uploaded and begin the upload again where you left off.
- For example: If the upload fails while uploading file 056, you should re-upload files 056 to the end, you do not need to select 001 through 055 again.
- Once the upload is complete, you can click the Log Off button in the upper-right corner if additional files do not need to be uploaded at this time.
Extracting your the zipped folder(s)
Extracting folders zipped using Send to Compressed (zipped) folder
The contents of these single .zip folders can be extracted by highlighting or opening the zipped folder in the Right Networks environment in File Explorer then clicking the Extract all button on the Extract tab that will appear at the top of File Explorer when inside a zipped folder or a .zip folder is highlighted.
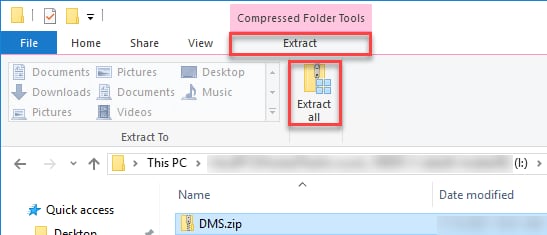
On the Extract Compressed (Zipped) Folders pop-up click Browse to browse to where you would like the folder extracted or type the desired path. If you zipped up your Detail folder and have already copied and pasted your DMS folder on the I drive per the instructions in the Run a Database Repair section above you would use the path I:\DMS to have the Detail folder directly extracted into the DMS folder. Click Extract once the desired path is entered.
Extracting folders zipped using 7-Zip
These files will need to be extracted using 7-Zip by a hosting agent. Please call for assistance.
Installing and setting up DMS
Lacerte Document Management System
- Login to your Right Networks My Account portal.
- Users with a Role of User (catalog) will be taken to the Auto Install Apps list. Users with a Role of Account Admin or Account Owner will need to click on the Users tab and select the user to get to the Auto Install Apps list for that user.
- DMS will appear in the list in alphabetical order as Lacerte Document Management System. Click Install App.
- The account does not need Tax Planner for DMS to work, but due to a quirk in the environment the current year Tax Planner needs to be installed. Tax Planner will appear in the list near the top as 20YY Tax Planner and Anaylzer (where YY is the two digit year of the program). Click Install App for the current year Tax Planner.
- The current year prep files will also need to be placed in the following locations for each DMS user:
- H:\Settings\Program Files\Lacerte\YYtaxpln\Data (where YY is the two digit year of the program)
- H:\Settings\ProgramData\Intuit\DMS\
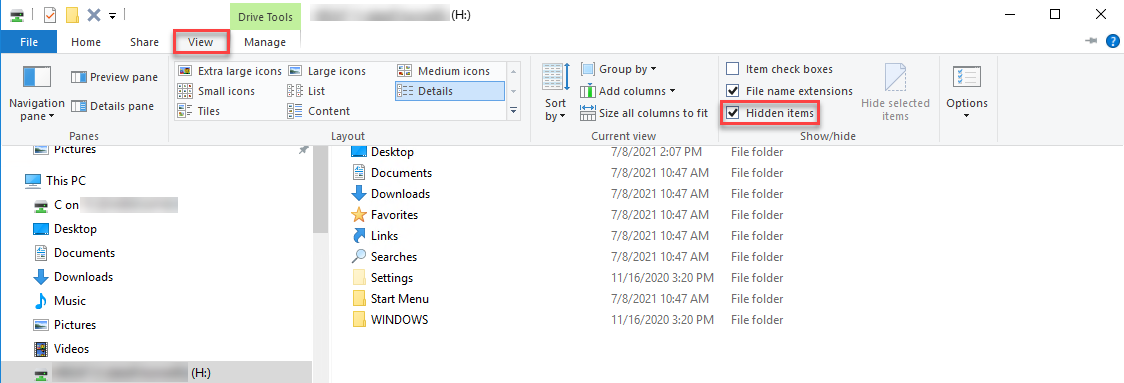
- Note: If you cannot see the Settings folder on the H drive click on the View tab in File Explorer and check Hidden items.
- Prep files can be downloaded from the My Account Dashboard or can be copied from the current year’s I:\Lacerte\YYtax\OptionYY folder then pasted into those paths (where YY is the 2 digit year of the program).
- You can copy and paste in the Right Networks environment using keyboard shortcuts Ctrl+C for copy and Ctrl+V for paste. The default is that keyboard shortcuts will work in Intuit Hosting when the Right Networks environment is maximized.
Alternatively, the Home tab in File Explorer has Copy and Paste buttons that can be used.
Copy will be grayed out until you have highlighted a file or folder and Paste will be grayed out until something has been copied.
- Open DMS in the Right Networks environment and close out of all pop-up windows until you see the main DMS window.
- Click on File at the top left of DMS, then hover over Database and choose Open.
- Click Browse then browse to your DMS Database then click OK. If you followed the steps in the Run a Database Repair section above and pasted your repaired DMS folder directly onto the I:\ drive then extracted the Detail folder to I:\DMS you would browse to I:\DMS.
ProSeries Document Management System
- Login to your Right Networks My Account portal.
- Users with a Role of User (catalog) will be taken to the Auto Install Apps list. Users with a Role of Account Admin or Account Owner will need to click on the Users tab and select the user to get to the Auto Install Apps list for that user.
- DMS will appear in the list in alphabetical order as ProSeries DMS. Click Install App.
- Open DMS in the Right Networks environment.
- Enter your Customer Number (CAN) and Zip Code for licensing when prompted then click OK.
- If you closed out of this window by mistake you will be in demo mode. Click on the Tools drop-down at the top of DMS and select Update License Information to get to where you can enter this information.
- Close out of all pop-up windows until you see the main DMS window.
- Click on File at the top left of DMS, then hover over Database and choose Open.
- Click Browse then browse to your DMS Database then click OK. If you followed the steps in the Run a Database Repair section above and pasted your repaired DMS folder directly onto the I:\ drive then extracted the Detail folder to I:\DMS you would browse to I:\DMS.
