- From the welcome email, click on the Activate Your Account button.
- You may also click on the here in the "Click here to Activate your account" step from your appointment confirmation email.
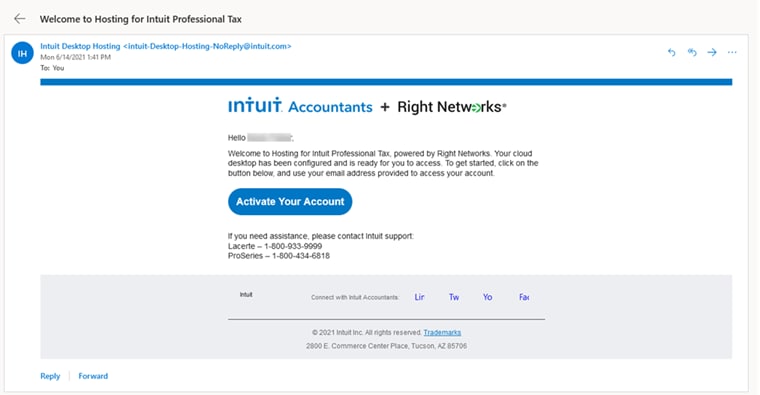
- You may also click on the here in the "Click here to Activate your account" step from your appointment confirmation email.
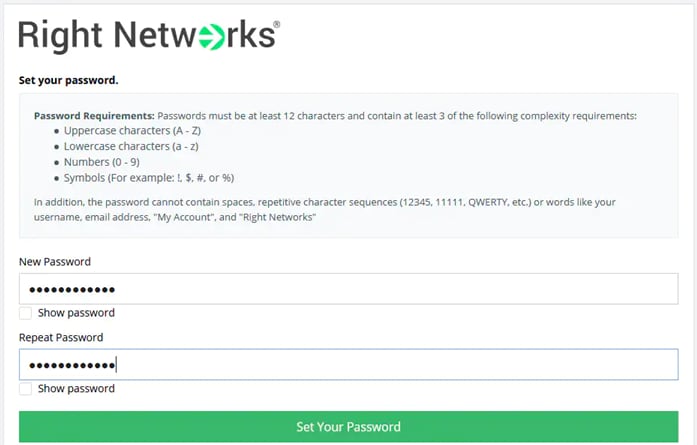
- Create a Right Networks password.
Intuit Help
Intuit
12-05-2019
07:00 PM
- Mark as New
- Bookmark
- Subscribe
- Permalink
- Report Inappropriate Content
Help Articles
This article will help you:
- Activate your Right Networks account.
- Install ProSeries into your Intuit Hosting environment.
- Add additional users to your Intuit Hosting environment.
- Additional users will want to follow the steps in this article to access their Intuit Hosting environment.
- Run the Right Networks Setup Wizard so that you can access the Intuit Hosting environment, as well as print and scan on your local computer.
- Manually set up your Intuit Hosting environment, if you're unable to run the Setup Wizard.
- Upload program data from the local computer to the Intuit Hosting environment.
Activating your Right Networks account, adding users, and assigning packages
Activate your account:
Sign in and select your package:
- Login to the Right Networks My Account portal with your email address and your newly created password.
- From the Create Your Profile screen enter the Country Code, Area Code, and Phone Number (without dashes).
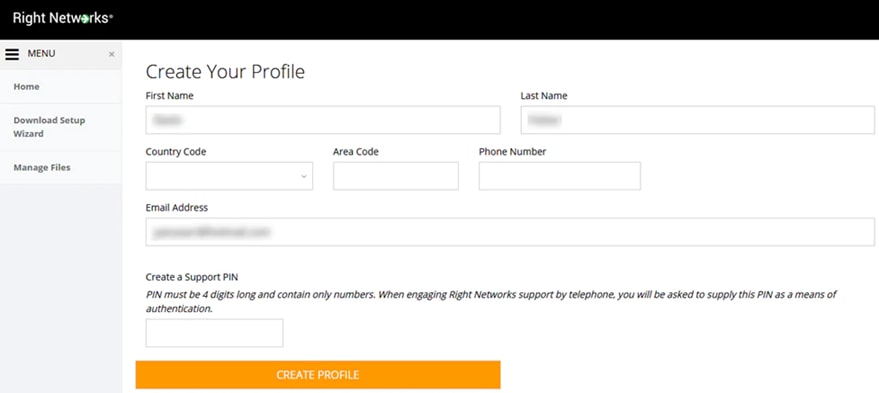
- Enter a 4-digit number of your choice in the Create a Support PIN field.
- Click Create Profile to go the Step 1 Welcome screen.
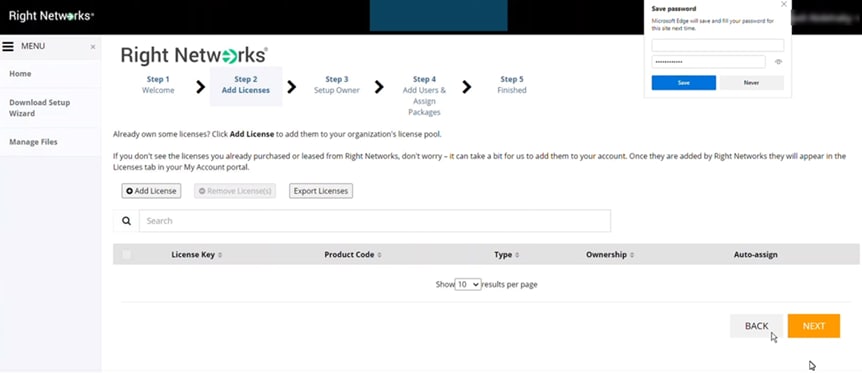
- The Step 1 Welcome screen shows your package(s) purchased through Intuit and introduces the wizard.
- Click Next to go to the Step 2 Add Licenses screen.
- Enter any existing QuickBooks licenses for users who will have QuickBooks in the environment, if applicable.
- You can enter licenses later, if needed. In addition to license(s), an add-on is required for users with an Intuit ProSeries Tax package to be able to install Quickbooks in the environment.
- You can enter licenses later, if needed. In addition to license(s), an add-on is required for users with an Intuit ProSeries Tax package to be able to install Quickbooks in the environment.
- Click Next to go to the Step 3 Setup Owner screen.
- The Step 3 Setup Owner screen allows the Account Owner to assign themselves one of the pre-purchased packages.
- Highlight the Intuit ProSeries Tax blue box to assign one of the packages to yourself, if applicable.
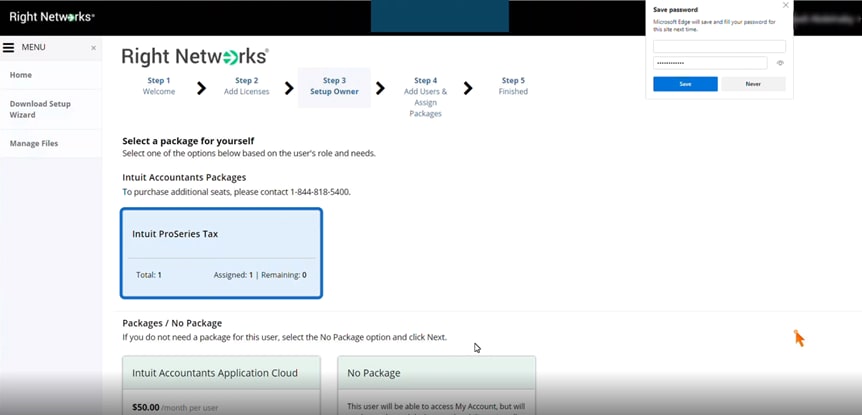
- Scroll down and click Next.
Add users (if needed) and complete the Welcome Wizard:
The Step 4 Add Users & Assign Packages screen lets you add other users. You'll be able to get to a similar screen where you can add users later by signing into the Right Networks My Account portal and clicking on the Users tab.
- Click Add User.
- If there will be no additional users, click Next then skip down to 7 below.
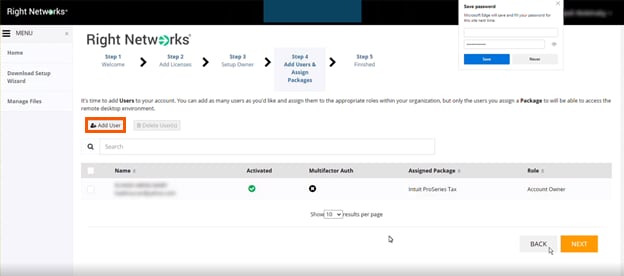
- If there will be no additional users, click Next then skip down to 7 below.
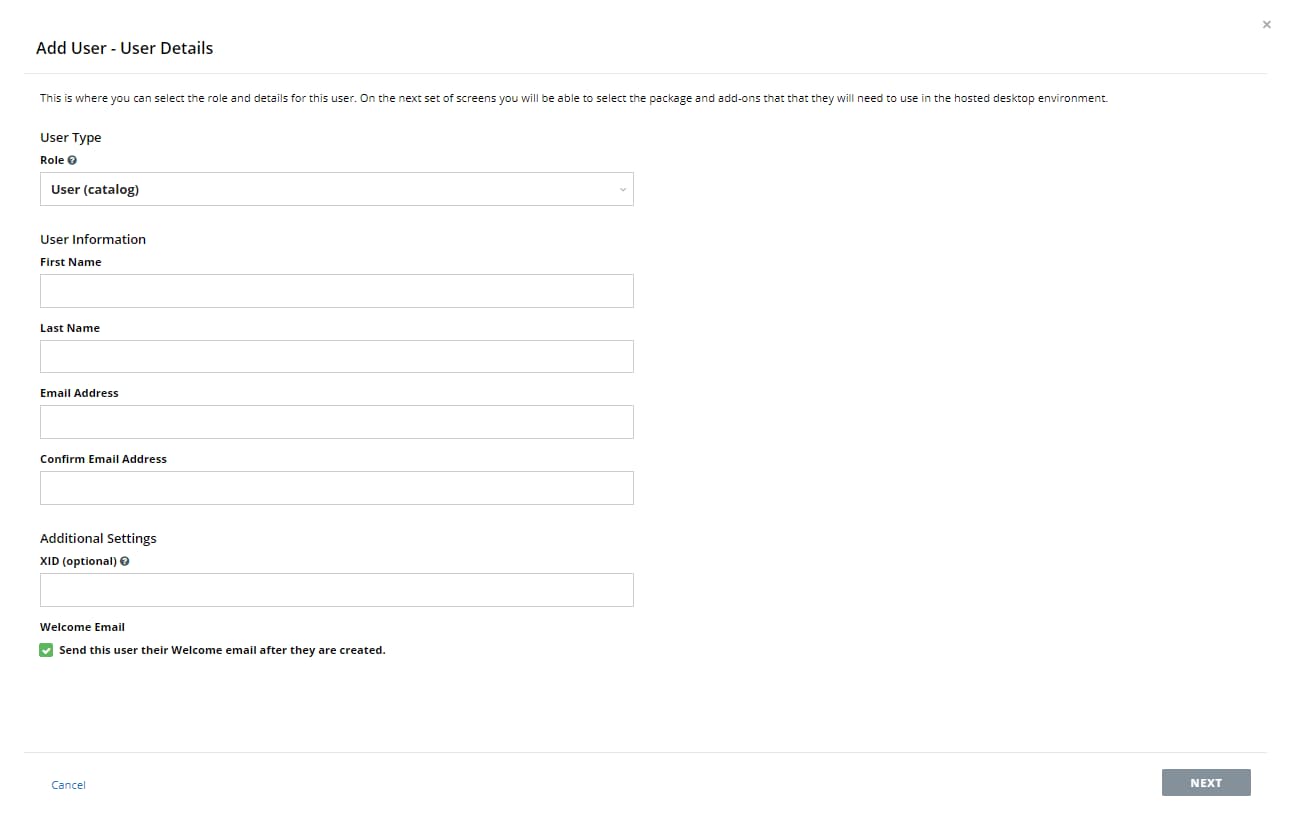
- Select a role for the new user from the Role dropdown.
- User (catalog) lets users install apps for themselves.
- User (no catalog) doesn't let users install apps for themselves.
- Account Admin is similar to the Account Owner role. These users can add/remove users, assign/unassign packages and add-ons, send password reset emails to users, and install apps for themselves and other users.
- Enter the new user's First Name, Last Name, and Email Address, and then click Next.
- The email address entered can't be in use on an existing Right Networks account.
- The email address entered can't be in use on an existing Right Networks account.
- Highlight the blue Intuit ProSeries Tax box to assign one of the packages to the new user.
- If you want the user to only have access to the Right Networks My Account portal, then scroll down and click Next instead.
- Make sure the new user's information is correct on the Add User - Review Details pop-up screen, and then click Add User.
- Repeat the above steps as needed. Once any desired users have been added, click Next.
- The Step 5 Finished screen is a recap. Click Continue to My Account.
Adding users and assigning packages after the Welcome Wizard
Adding users after the Welcome Wizard:
- Login to the Right Networks My Account portal.
- Select the Users tab.
- Click the Add User button.
- Select a role for the new user from the Role dropdown list:
- User (catalog) lets users install apps for themselves.
- User (no catalog) doesn't let users install apps for themselves.
- Account Admin is similar to the Account Owner role. These users can add/remove users, assign/unassign packages and add-ons, send password reset emails to users, and install apps for themselves and other users.
- Enter the new user's First Name, Last Name, and Email Address, and then click Next.
- The email address entered can't already be in use in Right Networks.
- Highlight the blue Intuit ProSeries Tax box to assign one of the packages to the new user.
- If you want the user to only have access to the Right Networks My Account portal, then scroll down and click Next instead.
- Make sure the new user's information is correct on the Add User - Review Details pop-up screen.
- Click Add User.
Assigning Intuit ProSeries Tax packages after the Welcome Wizard:
- Login to the Right Networks My Account portal.
- Select the Packages & Add-ons tab.
- Under Packages, click the Intuit ProSeries Tax link.
- Select the Assign Users to Package button.
- Check the box in front of the user(s) you'd like to assign a package to.
- Once you've selected the user(s), scroll down and click the Assign button.
- Users can only have one package assigned to them at a time.
- Switching a user to a different package will uninstall their apps because the package controls the apps that can be installed for the user.
- If a user needs ProSeries and also needs to install apps that aren't part of the Intuit ProSeries Tax package, they'll need an add-on. Add-ons are billed through Right Networks and can be purchased by contacting the Right Networks’ CPA Solutions Team at 1-888-417-4448 x1 + Option x3. This team is available Mon-Fri 9-5 ET.
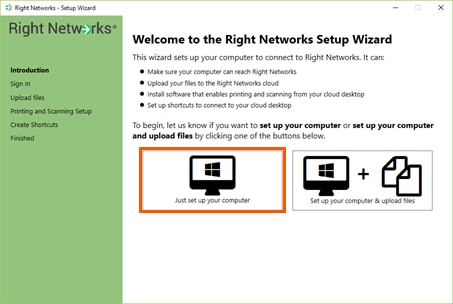
Setting up access from your computer
Click on the Download Setup Wizard link on the left of your Right Networks My Account portal, then click on the Windows or Mac button in the pop-up to download the appropriate wizard for your computer.
Note: The wizard can be run on multiple computers and set to use the same login. Keep in mind that only one computer can access the hosted environment at the same time with the same login. For example, if you leave your home computer signed in to the hosted environment and go to your office and use it to access hosted the home computer will be kicked off.
Running the Right Networks Setup Wizard on a Windows computer:
- Run the downloaded RightNetworksSetupWizard.exe.
- Click the Just set up your computer button.
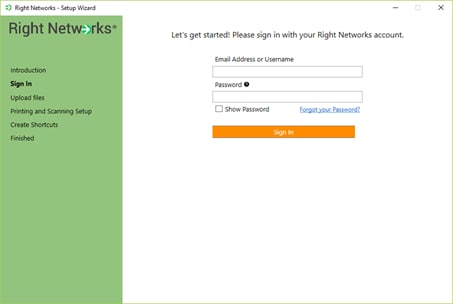
- Enter the email address that is your Right Networks username and the password you created.
- If you receive an error about not having permission to sign in or an "object reference not set to an instance of an object" error message, check the Right Networks My Account portal and make sure you have an Intuit ProSeries Tax package assigned to the email address being used.
- If you receive an error about not having permission to sign in or an "object reference not set to an instance of an object" error message, check the Right Networks My Account portal and make sure you have an Intuit ProSeries Tax package assigned to the email address being used.
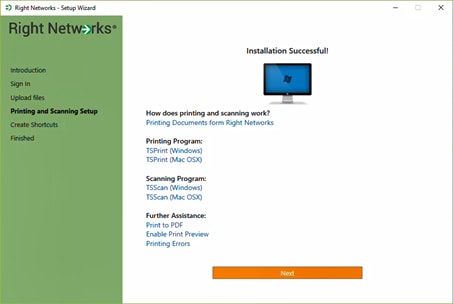
- The wizard will then install TSPrint and TSScan (used for printing and scanning). When you receive the Installation Successful! message click Next.
- Windows may ask if you want to allow the wizard to make changes at this point and later while running this wizard, select Yes if prompted.
- Windows may ask if you want to allow the wizard to make changes at this point and later while running this wizard, select Yes if prompted.
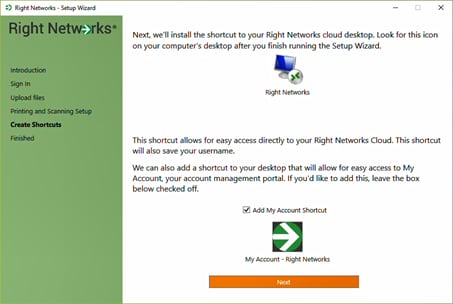
- The wizard will then add a Right Networks shortcut to your desktop and a shortcut to the Right Networks My Account portal. You may uncheck the Add My Account Shortcut checkbox, if desired. Click Next.
- When you see the You're Done! message from the Setup Wizard, click the Finish button to close it.
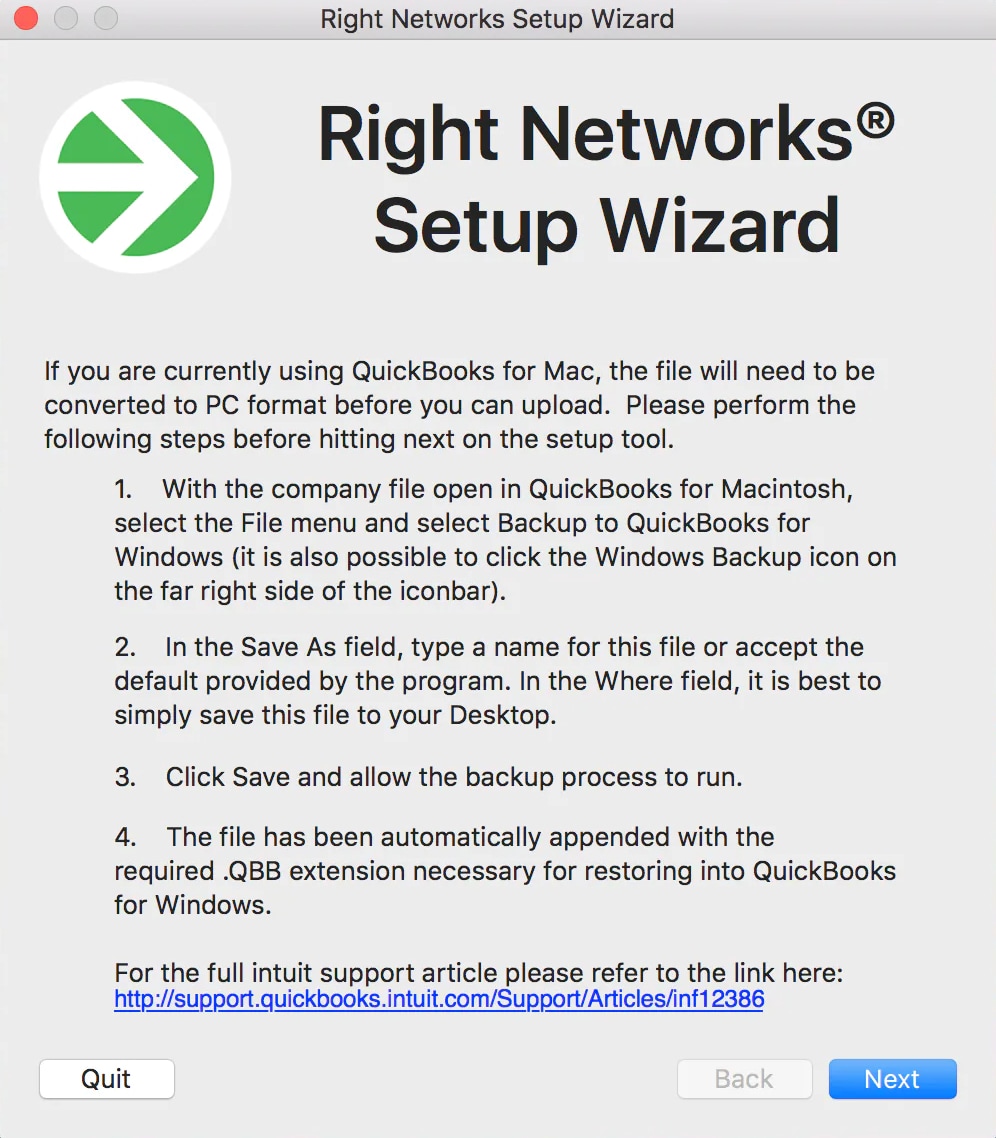
Running the Right Networks Setup Wizard on a Mac:
- Use Control (^) + click to run the downloaded SetupWizard.dmg
- You can hold down ⌥+⌘+L on your keyboard while in your browser to open your Downloads folder.
- If opened without using control + click, you may receive an error that this "can't be opened because Apple cannot check it for malicious software."
- The below screen is about QuickBooks. Click Next.
- The wizard will then check to make sure the Remote Desktop port (3389) is open in your firewall and check for currently active Remote Desktop or Citrix connections.
- Answer No for the first two questions.
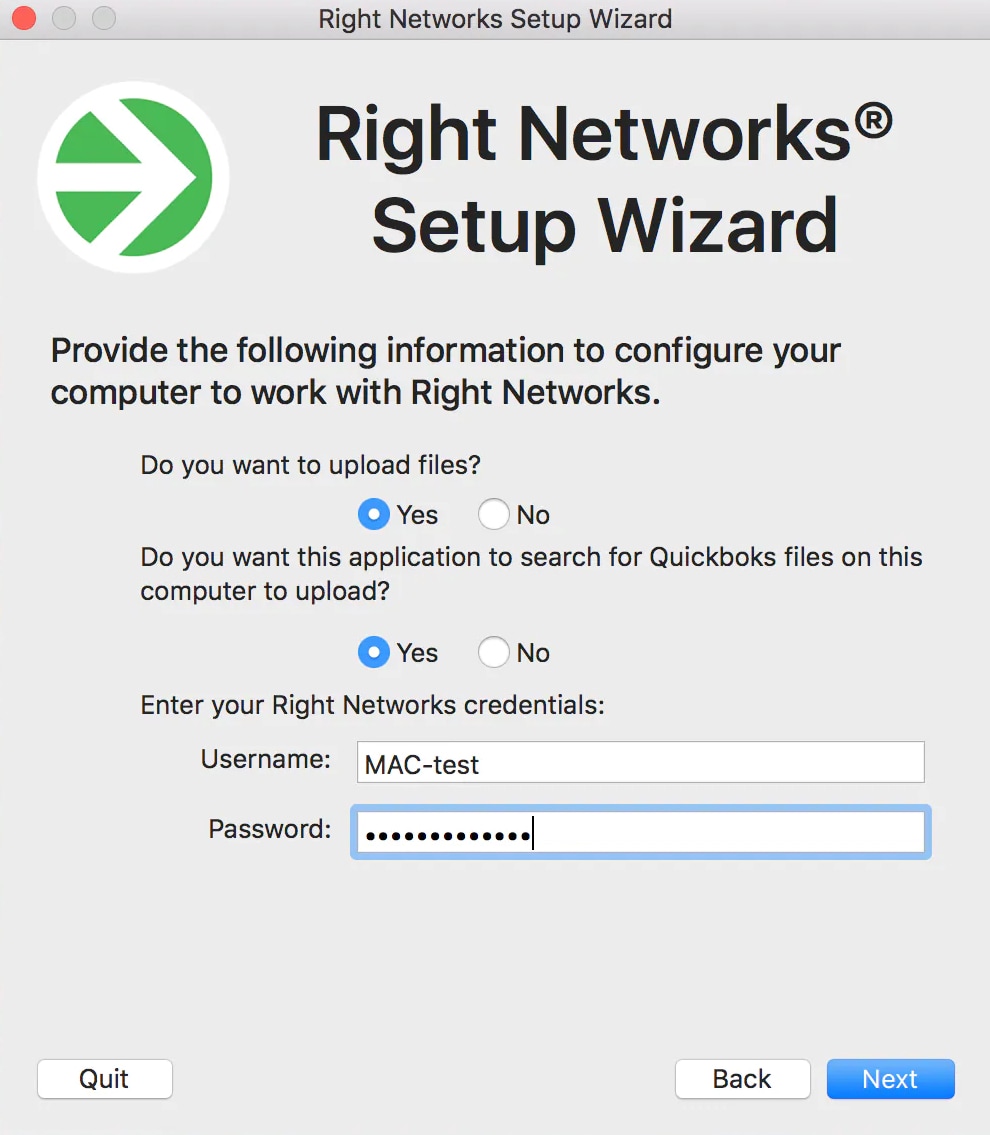
- Enter the email address that is your Right Networks Username, and then enter the Password you created.
- Click Next.
- If you receive an error about not having permission to sign in or an "object reference not set to an instance of an object" error message, check the Right Networks My Account portal and make sure you have an Intuit ProSeries Tax package assigned to the email address being used.
- The wizard will then create a desktop shortcut and setup printing and scanning. Click Finish once it's done.

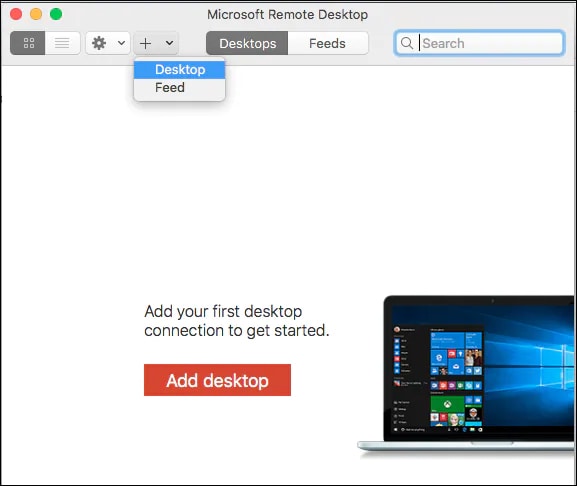
- If you don't already have the Windows Remote Desktop client installed on your Mac you'll be directed to the App Store. Click OK.

- When the App Store opens, you'll be directed to the download option for Microsoft Remote Desktop 10. Click GET.
- Once installed, open the Microsoft Remote Desktop Client.
- You'll see your Remote Desktop profile in the list.
- Double-click on the Remote Desktop profile to connect to your Right Networks hosted desktop.
The shortcut itself will display in the app shown above and will look like this: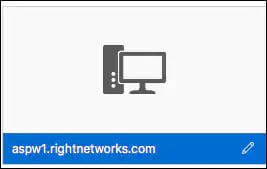
- While the app is running, it'll appear as an icon in your dock. We recommend pinning it permanently to the dock by right-clicking on the icon and selecting Keep in Dock.
In rare cases, you may not be able to run the setup wizard. Usually this is due to local system configuration. If this happens you'll need to manually set up access.
Manually setting up Right Networks if the Setup Wizard fails:
Windows
Step 1: Setting up printer and scanner access:
- Go to the Right Networks Help Page.
- Scroll down and select the Downloads tab.
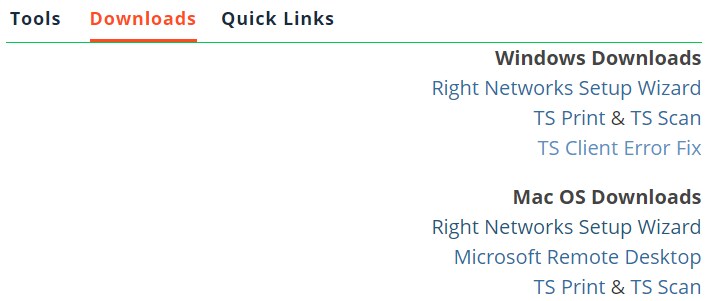
- Under Windows Downloads click on TS Print.
- Run the downloaded TSPrint_client.exe file.
- If you have a scanner attached to your computer (and might need to scan), click TS Scan and run the downloaded TSScan_client.exe file.
Step 2: Remote Desktop configuration:
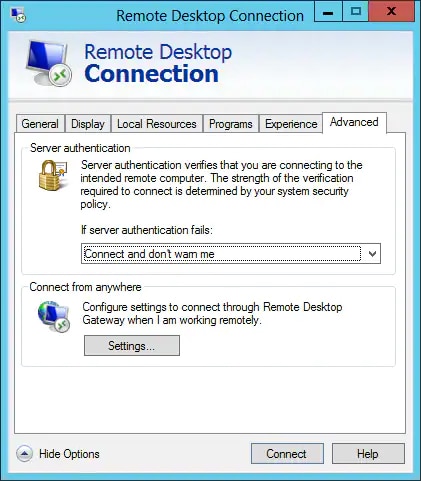
- In the Windows search box in the taskbar, type mstsc.exe and select the Remote Desktop Connection app.
- Go to the Advanced tab and select Connect and don't warn me from the If server authentication fails dropdown list.
- Go to the Experience tab.
- Select LAN (10 Mbps or higher) from the Choose your connection speed to optimize performance dropdown.
- If you have an especially slow internet connection, you may set this lower to improve the experience.
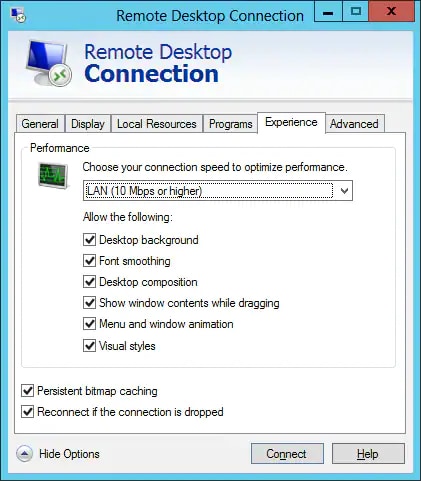
- If you have an especially slow internet connection, you may set this lower to improve the experience.
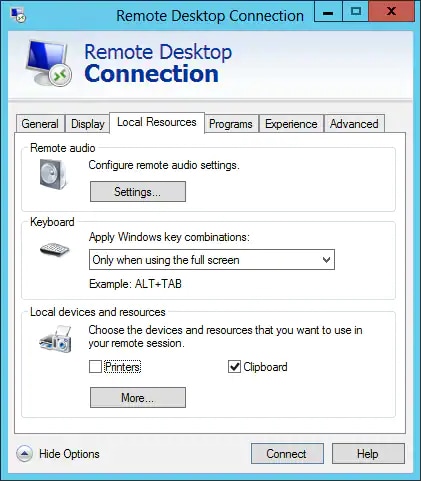
- Go to the Local Resources tab.
- Uncheck the Printers checkbox under the Local devices and resources section.
- Go to the General tab and enter your login address in the Computer field.
- If you don't have your login address, refer to the Alternate Procedure section in this Right Networks article for help, or call to speak with a ProSeries Intuit Hosting expert. See How to contact ProSeries for help.
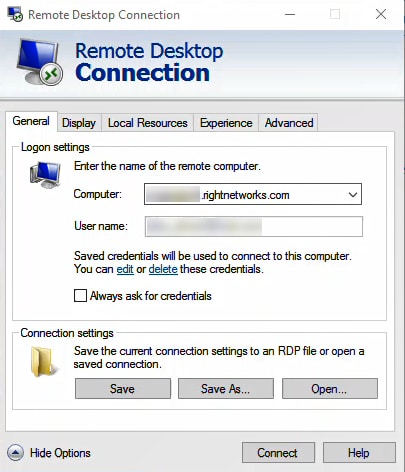
- If you don't have your login address, refer to the Alternate Procedure section in this Right Networks article for help, or call to speak with a ProSeries Intuit Hosting expert. See How to contact ProSeries for help.
- Enter the email address that's your Right Networks username in the User name field.
- In the Connection settings section, click Save As...
- Save to your desktop with the name RightNetworks.
Mac
Step 1: Setting up the printer and scanner access:
- Go to the Right Networks Help Page.
- Scroll down and select the Downloads tab.
- Under Mac OS Downloads click on TS Print.
- If you get an error that it "can't be opened because it is from an unindentified developer," this is due to Mac default security settings, which prevent apps that didn't come from their App Store from installing.
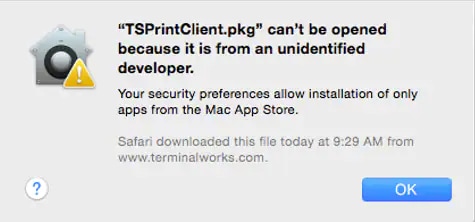
To resolve this error:- Click OK.
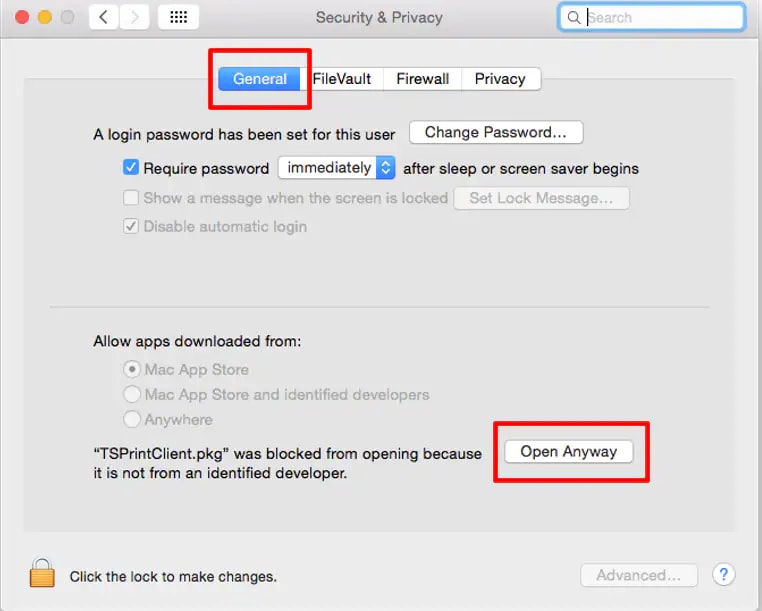
- Open System Preferences using the Apple icon in the top left corner of your screen.
- In the System Preferences window, select Security & Privacy.
- Click on the General tab.
- Under Allow apps downloaded from: click on Open Anyway for the TSPrintClient.pkg to start the installation.
- If you get an error that it "can't be opened because it is from an unindentified developer," this is due to Mac default security settings, which prevent apps that didn't come from their App Store from installing.
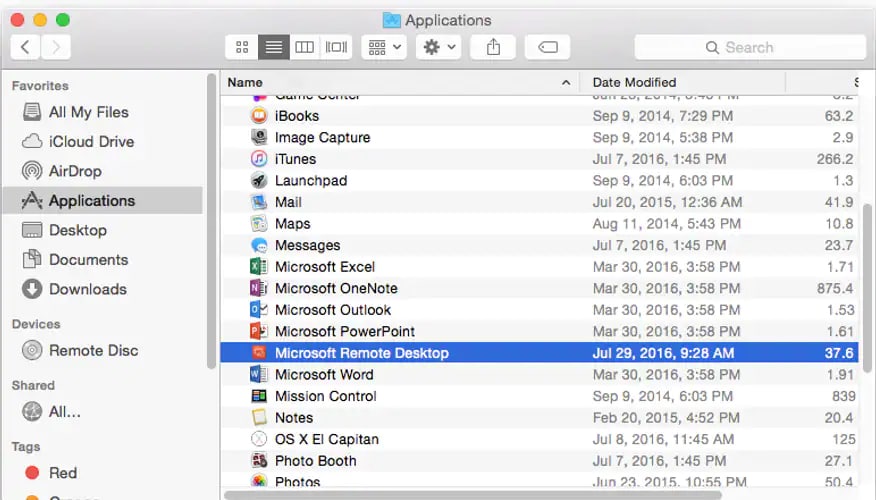
- Make sure that TSPrint is running on the Mac by locating the TSPrint icon in the top icon bar.

- If the icon is missing.
- Click on the Finder icon in the dock.
- In the Finder window, go to the Applications folder.
- Find the item for TSPrint Client and double-click on it.
- Once installed, you should see the TSPrint icon.
- If the icon is missing.
- If you have a scanner attached to your computer and may need to scan, click TS Scan and run the downloaded file.
Step 2: Remote Desktop configuration:
- Open the App Store.
- Search for Microsoft Remote Desktop 10.
- Click on GET to install the app.
- Open Applications and double-click Microsoft Remote Desktop.
- Right-click on the Microsoft Remote Desktop icon in your dock, select Options, and choose Keep in Dock.
- With the application open, click the plus (+) button and choose Desktop.
- In the PC Name field, enter your login address.
- If you don't have your login address, refer to the Alternate Procedure section in this Right Networks article for help, or call to speak with a ProSeries Intuit Hosting expert. See How to contact ProSeries for help.
- Click on the User Account field and select Add User Account.
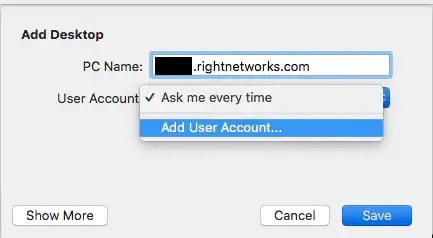
- Enter the email address that is your Right Networks username.
- Name the connection.
- We recommend giving the connection a friendly name, such as RightNetworks-especially if you have more than one Remote Desktop Connection.
- You'll be returned to the main app screen for Remote Desktop, where you'll see the connection you just created as an icon. Double-click the shortcut to begin the login process.
- If you didn't give it a friendly name, the connection will be identified by the login address.
- If you didn't give it a friendly name, the connection will be identified by the login address.
Installing Apps
The package assigned to a user (and add-ons if any) control what's available to install for them.
How to install apps:
- Login to your Right Networks My Account portal.
- Go to the Users tab.
- Select the name, or email address, of the desired user.
- The Account Owner, and users with the role of Account Admin, can install apps for any users that have been assigned a package.
- Users with the User (catalog) role that have been assigned a package can install apps for themselves and will be taken directly to the Applications tab when they sign in to the portal.
- Click Install App for all desired programs.
- The 9 most recent years of ProSeries and Fixed Asset Manager, along with the current version of ProSeries Document Management System, will be listed on the Auto Install Apps tab in the AVAILABLE section. Other apps are available to install both on this tab and the Manual Install Apps tab.
Step 1: Automatically backing up your client data and options using 2021 ProSeries
Creating you backup file:
- Open ProSeries Professional 2021 or ProSeries Basic 2021.
- From the File menu, select Migrate ProSeries.
- Select Yes to close ProSeries.
- Select Backup ProSeries.
- Select the years and versions you would like to include in the backup and click Backup ProSeries.
- If any other years or versions of ProSeries are open you'll be prompted to close them.
- Confirm your selecting by clicking OK.
- When complete select Close.
- You'll find a folder on your Desktop titled ProSeriesBackups. This folder can be moved to a USB drive or other transfer device to migrate your ProSeries data to a new computer. Click here for additional details on moving files to a USB device.
Alternative Step 1: Manually backing up your client data and options
- This article references default installation paths and uses YY to reference the tax year in 20YY format. C: will always indicate the local drive and X: will always indicate the network drive.
Preparing your client data and options to be moved:
You can install 9 years of the tax program in the hosted environment. You can upload all 9 years of data if wanted and older as a backup only; however, when a new year of the tax program gets released, the older program exceeding 9 years gets uninstalled. When this happens, your data will remain and can be downloaded if needed to restore locally.
- On your desktop computer, browse to your Data folder.
- For ProSeries standalone installations, this is usually in C:\ProWinYY.
- For ProSeries Network Installations, this is usually in X:\ProNetYY.
- Using Ctrl+click, highlight both the YYData folder and the Common folder.
- For Network versions year 2018 and newer the masterinventory.dat file can also be highlighted to include in the zip.
- Right-click on the YYData folder.
- Go to Send To and choose Compressed (zipped) folder.
- This will make a copy of the two folders into a zipped file giving it the name YYDATA.
- Repeat this process for each tax year you want to move into the hosted environment.
Step 2: Uploading your client data and options
Transferring files to the hosted environment through File Manager:
- Sign in to the Right Networks File Manager locally, outside the hosted environment.
- The I:\ drive is selected by default in the left column.
- Click the blue Upload button.
- The Upload Files pop-up has a Drag and drop files here area available for use.
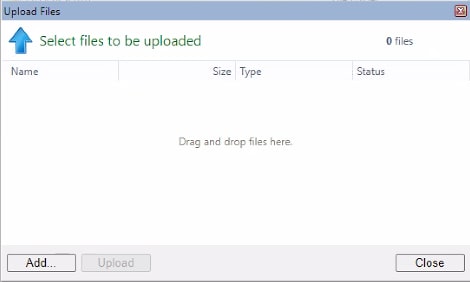
- If you won't be dragging and dropping, for each year you'll be uploading, you'll need to:
- Click the Add... button.
- Browse to where the zipped file was created.
- Highlight the zipped file and click Open.
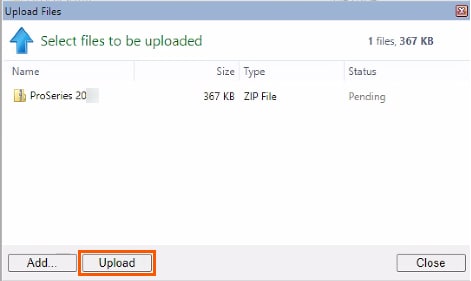
- Click Upload to begin copying the data to the hosted environment.
Step 3: Automatically restoring your client data and options using 2021 ProSeries
These steps do not need to be repeated for other users when the network version has been installed. Other users will start with an empty network version HomeBase. ProSeries will recognize the clients as new ones that need to be added to their HomeBase.
How to restore data from the backup file:
- Make sure each year of ProSeries is already installed before running the Migration tool.
- Open ProSeries Professional 2021.
- From the File menu, select Migrate ProSeries.
- Select Yes to close ProSeries.
- Select Restore ProSeries.
- Use the Browse button to Open the backup file.
- Under Select version(s) to restore check off each year and version you need to restore.
- Select the Restore ProSeries button.
- Confirm your choices and select OK to continue.
- Select Close.
When your installation is complete, your settings and data will be available within your new ProSeries installation. The Options Setup Wizard will open automatically, but may be closed.
In the hosted environment you can only install all network versions or all standalone versions of ProSeries Professional. For 2019 and older years that you locally had a different version installed, additional steps will be needed.
Complete these additional steps for each year using a different version
This article uses YY to reference the tax year in 20YY format.
- Browse to H:\ProWinYY\ and rename the HomeBase folder adding old to the end.
- You can use F2 (keyboard shortcuts work by default in the hosted environment when it's maximized) or select the Home tab in File Explorer and use the Rename button.
- Rename the YYData folder adding old to the end.
- For Network installations this will be in: I:\ProSeries20YY\ProNetYY
- For Standalone installations this will be in: I:\ProSeries20YY\ProWinYY
- Add a new folder in the same location.
- You can use Ctrl + Shift + N or select the Home tab in File Explorer and use the New folder button.
- Rename the new folder to YYData.
- Open that year of ProSeries. Before restoring, the needed states and formsets need to be installed.
- See Installing additional tax types and states under Step 4: Completing your program setup for instructions.
- Once ProSeries is updated, open that year again and restore your clients.
- From the File menu, choose Client File Maintenance and select Restore.
- From the Type dropdown select All Tax Returns.
- Select Set source directory and browse to the YYDataold folder then select OK.
- Click the Select all button, and then choose Restore client(s).
- If a state or formset was not installed you'll receive an error that lets you know which client file, what state, and the formset ProSeries could not restore.
- It's suggested that you note what you'll need to install and the client you'll need to restore later.
- If a state or formset was not installed you'll receive an error that lets you know which client file, what state, and the formset ProSeries could not restore.
Alternative Step 3: Manually restoring your files and folder
Unzipping the uploaded folders
Once the data has finished uploading to the hosted environment, it needs to be extracted before you can restore it to ProSeries.
Extracting the zipped folders:
- Open the Right Networks remote desktop using the Right Networks.rdp shortcut.

- Open File Explorer and browse to your I:\ drive.
- Highlight an uploaded zipped folder.
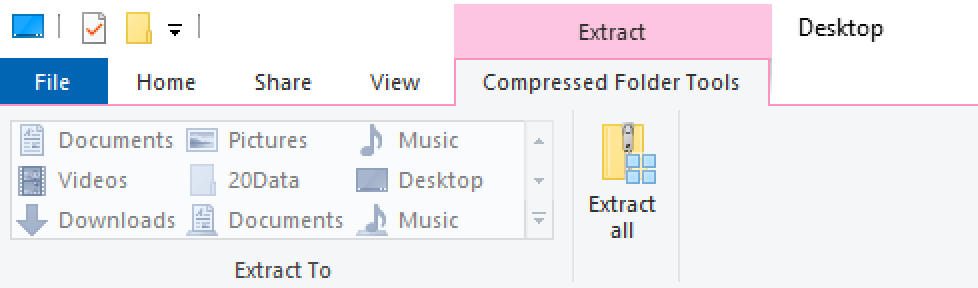
- Select the Compressed Folder Tools Extract tab that appears.
- Click on the Extract all button.
- The Files will be extracted to this folder field will default to the I:\ drive in a folder that would be created using the same name as the zip. Click Extract.
- Repeat the extraction process for each year uploaded.
Getting your options into place
Placing your uploaded common folder:
- Copy the extracted common folder.
- You can use Ctrl+C (keyboard shortcuts work by default in the hosted environment when it's maximized) or select the Home tab in File Explorer and use the Copy button.
- Browse to the appropriate location for that year's common folder:
- For Network installations this will be: I:\ProSeries20YY\ProNetYY
- For Standalone installations this will be: I:\ProSeries20YY\ProWinYY
- Paste the common folder.
- You can use Ctrl+V or select the Home tab in File Explorer and use the Paste button.
- You'll get a message that the destination has files with the same names. Select Replace the files in the destination.
Placing the masterinventory.dat for Network versions
The masterinventory.dat file was designed to ensure users on a network have the same tax types and states installed. By placing this before opening ProSeries, ProSeries will see that additional selections need to be installed without the need to manually check boxes.
Follow these steps to place the masterinventory.dat file for 2018 and newer:
- Copy the masterinventory.dat file.
- You can use Ctrl+C (keyboard shortcuts work by default in the hosted environment when it's maximized) or select the Home tab in File Explorer and use the Copy button.
- Browse to the appropriate location for that year's file: I:\ProSeries20YY\ProNetYY.
- Paste the masterinventory.dat file.
- You can use Ctrl+V or select the Home tab in File Explorer and use the Paste button.
- If there is already a masterinventory.dat file present you'll get a message that the destination has files with the same names. Select Replace the file in the destination.
Restoring your clients
Restoring client files into ProSeries in Right Networks:
Once your common folder is in place and you've installed what's needed, you'll need to restore your client files.
- Open ProSeries. Before restoring, the needed states and formsets need to be installed.
- See Installing additional tax types and states under Step 4: Completing your program setup for instructions.
- From the File menu, select Client File Maintenance and choose Restore.
- Click the Set source directory button and browse to the extracted YYData folder.
- Select All Tax Returns from the Type dropdown.
- Use the Select all button.
- If you don't want to restore all files, you can alternatively select just the client files you want to restore.
- Click Restore client(s).
Step 4: Completing your program setup:
Installing additional tax types and states
In the hosted environment, only the 1040, 1120, 1120S, and 1065 Federal Products are installed to start. This is because the ProSeries program is slow when everything is installed. You'll need to install what's needed to be able to open your client files.
- Open ProSeries.
- From the Update menu, choose Select and Download New Products.
- Be sure to check the desired Federal Products in the lower left in addition to checking the needed State Products.
- If you have more than one computer monitor, you may find it helpful to open the same year of ProSeries locally on your other monitor and navigate to this screen so you can compare it with what you installed locally.
- Click Next.
- Click Install Now when the Ready to Install screen appears.
Licensing ProSeries
You may be automatically prompted to license ProSeries.
To manually license ProSeries:
From the Tools menu, select License Products.
Updating your e-file acknowledgements
When you move your files over, e-file acknowledgements will need to be redownloaded.
Updating your e-file acknowledgements:
This option is available for the current tax year, and the two prior tax years, while the IRS Modernized e-File Status (MeF) is open.
- Go to the EF Center HomeBase view.
- Select the returns.
- From the E-file menu, select Electronic Filing.
- Select Update Acknowledgement Status of Selected Returns/Extensions/Payments.
- Choose to update Only the selected return.
- Select OK to retrieve the latest available status.
ProSeries Fixed Asset Manager (FAM)
Locating and zipping your FAM clients:
- On your desktop computer, browse to your Clients folder and confirm there are files inside.
- When saved on the C:\ drive this is normally C:\FamWinYY\Clients.
- To locate the FAM clients when they aren't in the above location:
- Open Fixed Asset Manager.
- From the Tools menu select Program Options.
- Select the Clients tab.
- Under File Locations make note of the Default Client Location.
- Browse to this location and confirm there are files inside.
- Right-click on the Clients folder.
- Go to Send To and choose Compressed (zipped) folder.
- If you are planning on uploading multiple years of FAM, rename the zip to YYFAM indicating the year.
Installing FAM:
- Login to your Right Networks My Account portal.
- Go to the Users tab.
- Select the name, or email address, of the desired user.
- The Account Owner, and users with the role of Account Admin, can install apps for any users that have been assigned a package.
- Users with the User (catalog) role that have been assigned a package can install apps for themselves and will be taken directly to the Applications tab when they sign in to the portal.
- Click Install App for the desired years of Fixed Asset Manager.
Unzipping and putting FAM clients in place:
- Open the Right Networks remote desktop using the Right Networks.rdp shortcut.
- Open File Explorer and browse to your I:\ drive.
- Highlight an uploaded zipped folder.
- Select the Compressed Folder Tools Extract tab that appears.
- Click on the Extract all button.
- The Files will be extracted to this folder field will default to the I:\ drive in a folder that would be created using the same name as the zip. Click Extract.
- Repeat the extraction process for each year's FAM clients that were uploaded.
- Browse to the extracted Clients folder and open it.
- Select all.
- You can use Ctrl+A (keyboard shortcuts work by default in the hosted environment when it's maximized) or select the Home tab in File Explorer and use the Select all button.
- Copy.
- You can use Ctrl+C or select the Home tab in File Explorer and use the Copy button.
- Browse to I:\FamWinYY\Clients.
- Paste the contents of the Clients folder.
- You can use Ctrl+V or select the Home tab in File Explorer and use the Paste button.
Uploading other data into the hosted environment
By default, the keyboard shortcuts will work in the hosted environment when it's maximized. Small files and folders can be copied locally. Then, you can browse to the desired location on your H:\ or I:\ drive and use the Ctrl+V shortcut to paste. Alternatively, you can open File Explorer, click the Home menu, and click Paste button. Larger sets of data will often require zipping.
Zipping a file or folder:
You can zip locally using the following steps:
- Right-click the file or folder and select to Send to.
- Choose Compressed (zipped) folder.
To zip in the hosted environment:
- Open File Explorer.
- Highlight the file or folder.
- From the Share menu, click the Zip button.
Using File Manager:
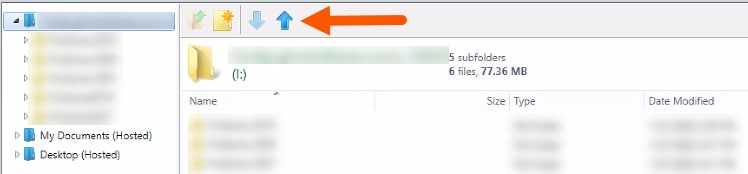
First, sign in to the Right Networks File Manager. The I:\ drive is selected by default in the left column.
![]() File Manager should be accessed locally, outside the hosted environment.
File Manager should be accessed locally, outside the hosted environment.
To upload to the highlighted location in the left column:
- Click the blue ↑.
- Either drag and drop the file(s) into the Drag and drop files here area, or click Add… and highlight the desired file(s) and click Open.
- Once you have the file(s) you want to upload added to the Upload Files window, click Upload.
To download:
- In the left column, highlight the drive or folder that contains what you want to download.
- On the right, highlight the desired file or folder.
- Click the blue ↓ and browse to where you want to save the download.
Unzipping a file or folder:
- Open File Explorer.
- Highlight the zipped folder.
- Select the Compressed Folder Tools Extract tab that appears.
- Click on the Extract all button.