Managing Access Rights in ProSeries
by Intuit•12• Updated 6 months ago
Starting in tax year 2019, you can assign Access Rights roles to specific users:
Follow these steps to turn on Access Rights in the program:
- From the Tools menu, select Users & Access Rights.
- Select Enable/Disable Access Rights Feature.
- Select Yes.
- Click Next.
- If this is your first time setting up Access Rights, we recommend assigning roles now by clicking Yes and then clicking Continue.
Follow these steps to assign a ProSeries Role to any user that already has access to ProSeries:
- From the Tools menu, select Users & Access Rights.
- Select Manage Users.
- In the PROSERIES ROLE column choose one of the four pre-defined roles (or create your own role):
- Administration
- Power User
- Tax Preparer
- Data Entry
ProSeries has four pre-defined roles:
- Administrator: At least one person in the firm should be the administrator. This role allows you to change other employees' roles and gives you full control over the ProSeries Features.
- Data Entry: This is the most restrictive role. This user will be able to open and enter data into returns and print basic reports.
- Power User: This user will have management level control. However, they will be restricted from accessing sensitive business information and deleting returns.
- Tax Preparer: This user will have the ability to enter and e-file returns, but they will have limited access to changing program options and deleting returns.
Follow these steps to see, and modify, the full list of what these roles have access to in your program:
- From the Tools menu, select Users & Access Rights then Manage User Roles.
- Click on the User Role on the left side to see Areas of Access.
You can create your own role on the same screen by clicking on Add New Role.
When trying to sign in to ProSeries, the following message appears:
"You do not have a role"
However, you're listed as the Primary Administrator in My Account Manage Users. When you look at Manage Users under Access Rights, you aren't listed. There's another user that's listed as Account Administrator and Software Administrator, and they don't get the warning.
Follow these steps to resolve the issue:
- Have the admin sign in to ProSeries.
- From the Tools menu, select Access Rights.
- Select Enable/Disable Access Rights Feature.
- Close ProSeries.
- Open ProSeries.
Verify whether Access Rights were used last year.
If Access Rights weren't used last year, leave them disabled.
If Access Rights were used last year, or if there is interest in using them this year, follow the steps below to enable them.
Follow these steps to enable Access Rights:
- From the Tools menu, select Access Rights.
- Select Enable/Disable Access Rights Feature.
Three things could cause this error. Begin with the first solution below and then re-open ProSeries. If you get the same error message, move on to the next solution.
- This article references default installation paths and uses YY to reference the tax year in 20YY format. C: will always indicate the local drive and X: will always indicate the network drive.
Solution 1
- Close the error message.
- Check for access to the network drive by attempting to open the \ProNet23\ folder.
- If the user is not able to access its contents, they will need to contact local IT to ensure network connectivity and allow the workstation access to the network drive where ProSeries is installed. They may also need to run the network utility.
- If the user can access its contents, proceed to the next step.
- Browse to the Common folder.
- For ProSeries Professional Stand Alone that's found at C:\ProWin24\Common
- For ProSeries Professional Network that's found at X:\ProNet24\Common
- Delete the Callisto.opt file.
- Delete the Callisto.bin file.
- Delete the Callisto.dat file.
- Once all three are deleted, attempt to open ProSeries again.
- If the program opens, you can continue using ProSeries. If you receive the same error, continue to Solution 2.
Solution 2
Repair the update:
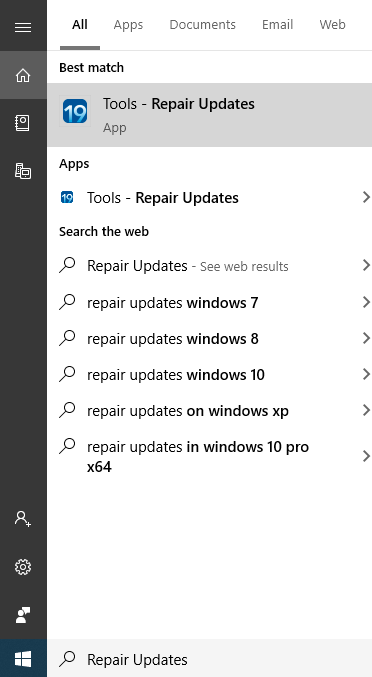
- Click on the Windows Start button in the lower-left corner of the screen.
- In the Search field, type "Repair Updates".
- If you're refreshing updates for tax year 2018 or prior ProSeries, type "ProSeries Refresh Updates", instead.
- From the results, select the Tools - Repair Updates option (or ProSeries Refresh Updates) for the relevant tax year.
- Attempt to open ProSeries again.
- If the program opens, you can continue using ProSeries. If you receive the same error, continue to Solution 3.
Solution 3
- Turn off all workstation computers.
- Shut down the server which hosts the common folder.
- Turn on the server and let it fully power up.
- Turn on the workstation computers.
- Attempt to open ProSeries again.
- If you receive the same error, contact our technical support team.
For more information on how to contact ProSeries, as well as our operating hours, see here.
You must sign in to vote.
Sign in now for personalized help
Ask questions, get answers, and join our large community of Intuit Accountants users.
