eSignature has been reimagined to be fully integrated within your workflow, saving you time and helping your office stay or become paperless.
To learn more about using eSignature in ProSeries -- both Professional and Basic, continue reading below.
Accessing the eSignature dashboard
ProSeries has a dashboard to cleanly and concisely manage your eSignature requests. Here's how you can access it:
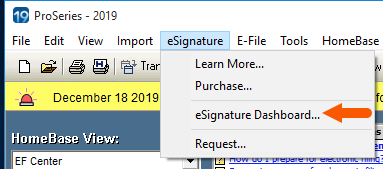
Option 1:
- Go to the eSignature menu and select eSignature Dashboard.
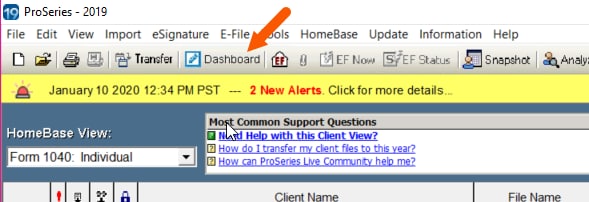
Option 2:
- Click on the Dashboard button at the top of your screen.
eSignature free-trial offer details
- Click the magenta Get Free eSignatures button in the upper-right corner.
- With this trial being available to new eSignature customers only, this button may not be present for all users.
- Follow the on-screen prompts to set up your free trial.

Offer of 5 free eSignatures available through Dec. 31, 2021, for Lacerte, ProSeries, and ProConnect customers who have not purchased eSignatures for tax year 2020 (after) as of January 13, 2021. Terms, conditions, pricing, features, service, and support options are subject to change without notice.
Purchasing eSignatures
- From the EF Center in ProSeries Professional or the EF Clients tab in ProSeries Basic, select on the eSignature menu, and select Purchase.
- Alternatively, go to the eSignature Dashboard and select the green Buy More button at the top right.
- If prompted, enter your login credentials.
- In the Purchase window, enter the number of eSignatures you wish to purchase and your billing information.
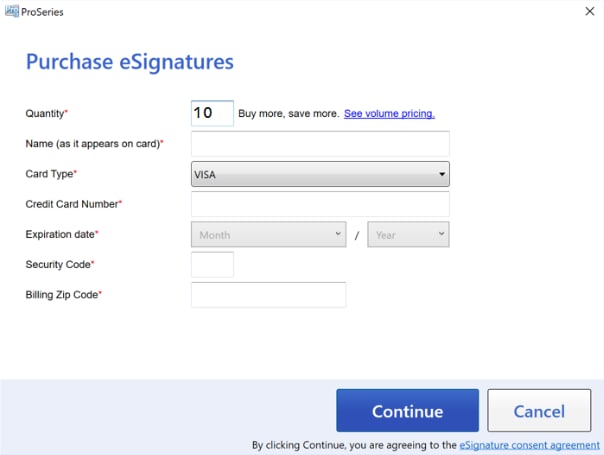
- Select Continue to review your purchase.
- Once you've reviewed your eSignature order to make sure all information entered is correct, select Confirm Purchase.
- When the order is successfully processed, your purchase will be confirmed and your eSignature balance will be updated.
Any eSignature purchase is neither refundable nor transferable, meaning they can't be carried to another calendar year. Because of this, it is advised that you don't purchase more than you need to use for the current tax season. Purchases made in the current year can be used in the prior-year.
Creating email templates for eSignature requests
You can create and save multiple email templates for eSignature. These templates can be used when sending eSignature requests to your clients. If you have a subset of clients that you would like for them to receive a specific email message when you send them a request, you can create and save that email message as a template for later use.
To create your custom eSignature email template follow the steps below:
- Start the eSignature wizard.
- Select the documents that require an eSignature and then select Next.
- On the Recipients screen, select the gear icon in the email message section.
- In the email templates section, you can add new email templates, edit, or delete existing templates.
Sending eSignature requests
Before you start:
- Make sure the tax return is set up for e-filing on the Federal Information Worksheet.
- Make sure you've completed the return and resolved all You Must Fix Final Review errors.
- Starting in tax year 2020 the IRS now allows electronic signatures on Form 2848 and 8824.
- If the return is setup for Pay-by-Refund, the taxpayer will also receive the bank applications and required signature forms needed to process the Pay-by-Refund.
To send eSignature requests:
- From the EF Center in ProSeries Professional or the EF Clients tab in ProSeries Basic, select the client you want to send the request to.
- From the eSignature menu, select Request.
- The standard tax forms will be displayed. Check the box to include a copy of the tax return, if desired.
- Select Continue to be taken to the Request eSignature screen.
- Here you can delete or view any document you want to send to your client.
- For instructions on adding additional documents, see the "Sending a request with additional documents" section below.
- When you're satisfied with the list of documents, click Next to continue to the Recipients screen.
- Review your client's name and email address for accuracy, and edit the email message they'll receive, if needed.
- Select Next to continue to the reminders and expiration options.
- Check the box next to any reminders you want to send, and press Next to review your request.
- Once you're satisfied with the request details, click Send.
Sending a request with additional documents
- From the EF Center in ProSeries Professional or the EF Clients tab in ProSeries Basic, select the client you want to send the request to.
- From the eSignature menu, select Request.
- The standard tax forms will be displayed. Check the box to include a copy of the tax return, if desired.
- Click on Start a request to continue to the Request eSignature screen.
- Here you can add, delete, or view any document you want to send to your client.
- To add a document, choose the document type from the dropdown menu, then click Browse to select a PDF from your computer.
- If you select Reference document as the type, that document will not require a signature from your client.
- When you're satisfied with the list of documents, click Next to continue to the Recipients screen.
- Review your client's name and email address for accuracy, and edit the email message they'll receive, if needed.
- Click Next to continue to the reminders and expiration options.
- Check the box next to any reminders you want to send, and press Next to review your request.
- Once you're satisfied with the request details, click Continue to DocuSign so you can insert signature tags on the 'other' documents as needed. A new tab will open that displays the documents you included.
- The documents will be listed on the right-hand side of the page. Select the 'other' document you manually attached.
- Drag and drop the Signature tag(s) located on the left side of your screen to the location your client needs to sign.
- Click the Send button to send the request to your client.
Viewing and downloading completed eSignature documents
This section describes how to view and download your completed documents signed with eSignature.
To view your completed documents:
- Click on the eSignature Dashboard tab.
- Click on Ready to e-file on the Action Required card. This will display only the client with completed eSignatures.
- You can search for specific client by using the Search field as well. Type the clients name or their email address in the Search field to find the client.
- When all documents are signed, the eSignature status column will show eSignature Completed. To view the signed documents, click the drop-down menu on the Actions column and select View.
- Choose the PDF you wish to view.
To download your completed documents:
- To download the documents, click Download under the Actions column.
- Select a local folder or network folder to save the .zip file.
- Type the name of the file or elect to keep the default name.
- The default format for the name of the file is esign-documents-Client#.zip.
- Click Save.
Canceling an eSignature request
Once an eSignature status is Completed, it cannot be canceled. Simply resend a new eSignature request to the client.
To cancel an eSignature request.
- Open the eSignature Dashboard.
- From the left navigation panel, select Usage.
- Locate the client from the list.
- Select Void Request.
- On the Cancel eSignature Request window, select Confirm.
Using eSignature with foreign addresses
While eSignature itself will allow requests to be sent to taxpayers with foreign addresses, the feature uses a Knowledge Based Authentication (KBA) service similar to what you'd see when checking your credit report online. Foreign addresses may cause complications for the taxpayer in authenticating their information.
Checking the remaining balance of eSignature uses
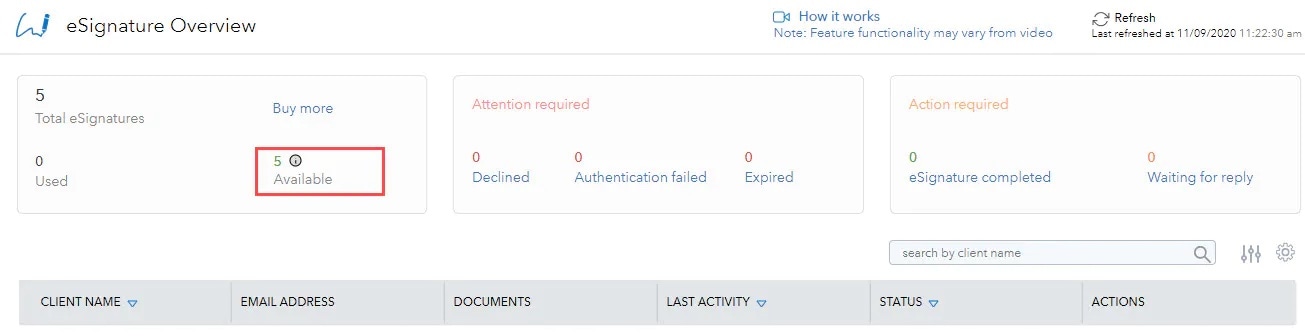
You can view the remaining eSignature uses left by accessing the eSignature Dashboard.
You can access the eSignature Dashboard by selecting the Dashboard button below the File menu, or by going to the eSignature menu and selecting eSignature Dashboard.

The remaining balance will show in the top left box as Available.
Viewing and updating the status of an eSignature request
You can view the status of an eSignature Request on the ProSeries EF Center HomeBase View. The client's eSignature status will be displayed in the E-Sig Status column.
E-Sig Statuses that may be displayed in the ProSeries EF Center HomeBase View include:
- Request - An eSignature request has not yet been sent to the client. A Request status is a hyperlink. Click this status to initiate an eSignature request to the client.
- Sent - An eSignature request has been issued to the client and is currently outstanding.
- Expired - An eSignature request has been issued to the client, but remained outstanding beyond the expiration. The request is now Void, but a new request may be issued to the client. To send the client a new eSignature request to this client, select the client and from the E-File menu select Electronic Signature then Request.
- Declined - An eSignature request was issued to the client and was received, but the client declined your request to sign the document electronically. The request is now Void, but a new request may be issued to the client. To send the client a new eSignature request to this client, select the client and from the E-File menu select Electronic Signature then Request.
- Failed Auth - An eSignature request was issued to the client, but the ID-Check failed to confirm the identity of the individual accessing the signature request. The request is now Void, but a new request may be issued to the client. A Failed Auth status is a hyperlink. Clicking this status will provide details on how to resubmit an eSignature request to the client.
- Completed - An eSignature request was issued and your client has electronically signed the requested docucment(s). A Completed status is a hyperlink. Clicking this status will open the signed documents that have been returned to you.
To check for status updates to your outstanding eSignature requests:
- Open ProSeries EF Center HomeBase View
- From the ProSeries E-File menu, select Electronic Signature.
- Select Update Status.
- ProSeries will check for updates and refresh the E-Sig Status column.
Related topics
