Before you start:
- Intuit ProSeries has two methods of importing tax data; see Understanding the differences between Tax Import and Tax Scan and Import to review the differences.
- For best results scan documents at 300DPI in Black and White.
- This feature isn't available in ProSeries Basic.
- Make sure the PDF is saved to the computer and you know where it's saved.
- To learn more, refer to ProSeries Data Import.
To begin the process:
- Open ProSeries to the Form 1040 Individual HomeBase View.
- Select the client.
- From the Import menu, select Tax Import, then Import Client Data from Scanned PDF.
- On the Import From Scanned PDF wizard select Continue.
- Use Browse to locate and select a PDF saved on your computer, or Browse from DMS if the PDF is saved in DMS.
- Select Send.
What's next?
- Once you select Send you'll get a a confirmation screen will show Your Submission For this Client was Started in the Background.
- ProSeries will periodically check the status of your submission and update the Scan Source Documents column in the HomeBase view.
- You can continue working in ProSeries as normal while the submission is processed.
- Your client's submitted source documents may take between 15- 30 minutes but may also take up to 12 hours to process depending on volume.
- When complete, your status will update to Ready to Import.
- To import the data into the client's return, open the return and the Pre-Import tool will be displayed.
How can I tell the status of the scanned documents submitted to ProSeries Tax Import for processing?
In your ProSeries HomeBase, review the Tax Import Scanned Documents Status column.
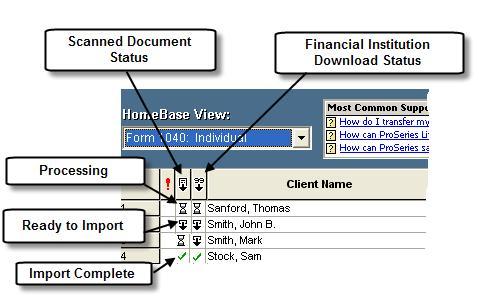
- Processing: This status indicates scanned source documents have been submitted and are currently being processed. The program will check the status periodically and change the status when the job is ready.
- Ready for Import: This status indicates your job has successfully processed and the data is ready to be reviewed and imported into the return. To begin reviewing and importing the data, click the Ready for Import hyperlink in the client list. You'll be taken to the Pre-Import Tool.
- Import Complete: (Open Review Files) This status indicates that data has been successfully imported into the client's return. If a partial import is performed, you can't return at a later time and import the remaining data. Select from Multiple Jobs... will appear when more than one job has been submitted for a client. To view the status of each job, click the hyperlink to open a window where you can see the status of each job. The same statuses will appear in this window as defined in this list with one exception:clients whose job is Processing won't appear here until the processing is complete and they're Ready for Import.
- Failed Job, Please Submit Again: This status indicates that the job that you submitted couldn't be successfully processed. Make sure that your scanned documents aren't password protected and were scanned at 300 dpi in black and while. Check the readability of the documents, make corrections, and re-scan if necessary. Then, resubmit the documents for processing.
