Table of contents:
How to print in Rightworks for Intuit Hosting:
When printing within the hosted environment, you'll need to use one of the following TSPrint options as a go-between to communicate with your local printer(s):
- TSPrint Printer: Choose this option if you use multiple printers. When you print to this choice, you'll be provided a list of printers for your local computer so you can select the one you want to use.
- TSPrint Default: This option is best for a single-printer environment. When you print to this choice, the print job is sent to the default printer for your local computer.
- TSPrint Printer (Mac OSX / Linux): Choose this option only if you're using a Mac. When you print to this choice, you'll be provided a list of printers for your local Mac so you can select the one you want to use.
- TSPrint PDF: When you print to this choice, you'll be given the choice to email or save to PDF either locally or in the hosted environment. See Printing to PDF below for more information.
![]() You must choose one of the TSPrint options. Do not select any other printer.
You must choose one of the TSPrint options. Do not select any other printer.
Printing to PDF:
You can print to PDF normally, but you need to be sure to save your PDF to the hosted environment.
If needed, after you have saved a PDF to the hosted environment, copy and paste it locally to the desired location. You can use Ctrl+C to copy (keyboard shortcuts work by default in the hosted environment when it's maximized) or select the Home tab in File Explorer and use the Copy button.
You can also save to PDF by selecting the TSPrint PDF choice. This choice will not have the option for the PDF to be password protected. (We do not suggest using this when saving PDFs of Lacerte returns. This method will save a PDF without the Lacerte bookmarks that let you select a form to jump to that part of the PDF.)
How to save to PDF or attach to email using TSPrint PDF:
To use TSPrint PDF, you start by printing to TSPrint PDF as if you were printing to a regular printer. You'll be given choices to Save PDF or Send Email.
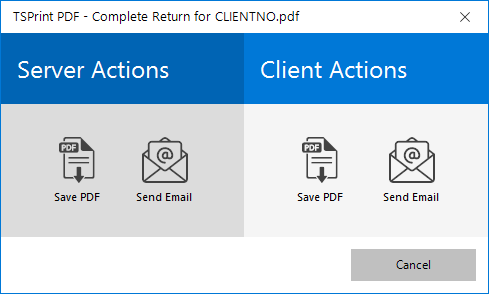
The choices under Server Actions would be used to complete these actions in the hosted environment, so these are usually not used.
The choices under Client Actions interact with your local computer. Save PDF lets you save to your local computer. Send Email will start an email with the PDF attached using your local computer's email program.


Setting the TSPrint option you want to use in Lacerte:
- From the Settings menu, select Options.
- Select the Setup tab.
- Scroll down to the Printer Selection section and choose the TSPrint option you want to use from the Printer dropdown.
- Click OK.
Setting the TSPrint option you want to use in ProSeries:
- From the File menu, select Print Options.
- Under Global Print Options, choose Printer, PDF, and DMS Setup.
- Under Printer and File Setup, for each of the listed areas select Change and choose the TSPrint option you want to use then click OK.
- Click OK.
Setting the default printer to a TSPrint option in the hosted environment:
If you need to change the default printer in the hosted environment to a different TSPrint option, complete the following steps:
- Open the Printers shortcut on your hosted desktop.

- Select the desired TSPrint option to highlight it.
- Choose Set as default.

Troubleshooting printing issues:
- If you cannot print, check to make sure you can print to your printer locally. Your printer might have not have power, the connection might be loose, or you might have an error displaying on your printer due to a paper jam or other issue.
- When printing within Rightworks, you may experience a small delay due to internet communication. See this article if there appears to be slowness issues beyond the expected delay.
- If you print from the hosted environment directly to your local printer, or save a PDF locally, without using one of the TSPrint choices as a go-between, this may cause your tax software to freeze.
- If Windows doesn't give you a prompt with the option to Close the program, you'll need to appropriately close the hosted environment.
- A good first step when experiencing a printing issue is to appropriately close the hosted environment, and then go back in to try again.
- When you are having an issue printing from your tax program, it's a good idea to test to see if you have the issue from another app, year, tax type/module, or client file. Knowing where the issue is occurring can help point towards possible solutions. For example, if you have the problem with only one client file it would be unlikely that uninstalling and reinstalling the TSPrint Client would help.
- If you are receiving a TSPrint client communication error see this article.
- If you are printing to TSPrint Default, make sure you have a default printer selected on your local computer.
- Uninstall/reinstall the TSPrint Client.
- Try adjusting TSPrint's options to use TSPrint 2 instead.
- If you are experiencing issues printing from EasyACCT, in addition to trying the above troubleshooting steps you may have printers that were not fully removed locally causing freezing or may need to rename a file specific to that program.
- Check your hosted shortcut's configuration to ensure that it is not set to see local printers.
- For Windows users, make sure that Remote Desktop Connection is being used to open your hosted shortcut.
How to appropriately close the hosted environment:
Rightworks does have automatic maintenance in place to resolve printing issues. By logging off then back in you are switched to a different computer running things in the background so this will often get you up and running right away.
This is the equivalent of running the PDF Repair tool for a local installation.
- Double-click the red logoff button to sign out of the hosted environment.

- If you are missing this icon, or can't get to it, right-click on the Start/Windows icon in the hosted environment, select Shut down or sign out, and choose Sign out.
How to make sure you have a default printer set locally:
- Minimize the hosted environment.
- On your keyboard, hold down the Windows key and press R.
- Type control printers, and then click OK.
- If you have a default printer it will be checked. If there is no printer checked, select the desired printer, and then from the File menu choose Set as default printer.
How to uninstall/reinstall the TSPrint Client:
The TSPrint Client can be uninstalled from your local computer just like other programs. The steps included to uninstall TSPrint Client are just one method of uninstalling.
- Double-click the red Logoff button to sign out of the hosted environment and end other remote sessions if open.
- If you are missing this icon, right-click on the Start/Windows icon, select Shut down or sign out,and choose Sign out.
- Click on the Start/Windows icon in the lower left of your local screen.
- Type uninstall and select the Add or remove programs choice it finds for System settings.
- Select TSPrint Client.
- Choose Uninstall.
- Go to the TerminalWorks TSPrint download page.
- Select Download Client.
- Mac users will first need to select the appropriate choice from the dropdown.
- Run the downloaded TSPrint_client.exe and follow the prompts to install.
- Sign back in to the hosted environment and test printing again.
How to adjust TSPrint's options:
- Double-click the red Logoff button to sign out of the hosted environment.
- If you are missing this icon, right-click on the Start/Windows icon, select Shut down or sign out,and choose Sign out.
- Click on the Start/Windows icon in the lower left of your local screen.
- Type options and select the Options App.

- On the General tab under Printing Options change the PDF Print Engine dropdown from its current setting to TSPrint 2.
- Choose Apply.
- You may be prompted to restart your computer. If you do get this prompt you will need to restart before testing to see if the issue is resolved.
- Sign back in to the hosted environment and test printing again.
Troubleshooting EasyACCT printing issues:
EasyACCT freezing when printing:
EasyACCT sees printers differently than most programs. It can see printers that were partially removed from a computer causing it to appear to freeze when printing. These printers and drivers can be removed from printmanagement.msc, however making changes there is not suggested without the help of an IT professional.
Check the remote desktop connection configuration to make sure that the hosted EasyACCT program cannot see your local printers. Once the configuration has been changed and you reconnect to the environment, please call to speak with a hosted expert if you still appear to be experiencing this issue.
For more information on how to contact Lacerte, as well as our operating hours, see here.
For more information on how to contact ProSeries, as well as our operating hours, see here.
Other EasyACCT specific printing problems
You may need to rename the EZPrtSet.dat file if you are experiencing one of the following issues:
- EasyACCT is not saving the printer settings.
- You cannot print from EasyACCT but can from other programs in the hosted environment.
- The print window closes after clicking the begin printing button.
- You receive runtime error 0 (RTE 0) when trying to print from EasyACCT.
EZPrtSet.dat is located in H:\Settings\EASYW in the hosted environment. To see the Settings folder, in File Explorer, select the View tab and check Hidden items.
When you rename EZPrtSet.dat adding old to the end, the next time you open EasyACCT it will add a new default version of this file. You can use F2 (keyboard shortcuts work by default in the hosted environment when it's maximized) or select the Home tab in File Explorer and use the Rename button.
How to check the remote desktop connection configuration:
The setup wizard used to set up access to the hosted environment creates the shortcut to access the hosted environment with the Printers box unchecked to improve performance and reduce the possibility for error when printing from the hosted environment.
If you edited this shortcut, or manually configured it, you may have checked Printers. Follow these steps to check the configuration and change it if needed:
- Right-click your shortcut to access the hosted environment and select Edit.

- Windows 11 users will need to select Show more options first to see Edit.
- Select the Local Resources tab.
- Look under Local devices and resources to see if Printers is checked.
.png)
- If the Printers box is unchecked, you can select the x to close out of the window.
- If the Printers box is checked:
- Unselect Printers.
- Return to the General tab, and select Save.
- No confirmation will appear. Once this is done you can select the x to close out of the window.
- Close out of the hosted environment then re-enter to start a new session using this new configuration.
Making sure Windows uses the correct app for your RDP connection
Windows allows users to select which program to use to open files. The Remote Desktop Connection app is already pre-installed on Windows computers and starts as the default app to open RDP connections. If Windows settings get changed to have RDP connections made using a different app, printing will usually not work.
The easiest way to identify if this may be your printing issue is by looking at your shortcut to access the hosted environment. For Windows, the icon for RDP shortcuts (when set to open with the Remote Desktop Connection app) should look like a computer monitor with green arrows:
If your shortcut looks different (usually with red arrows):
- Logoff using the red logoff button to exit your hosted session.
- If you are missing this icon, or can't get to it, right-click on the Start/Windows icon in the hosted environment, select Shut down or sign out, and choose Sign out.
- Right-click your shortcut to access the hosted environment.
- Go to Open with and select Use another app.
- Select the Remote Desktop Connection app so it's highlighted.
- Select More apps if you do not see this choice.
- Check Always use this app to open .rdp files.
- Choose OK.
- Go back in to the hosted environment and make sure you can print.
How to scan in Rightworks for Intuit Hosting:
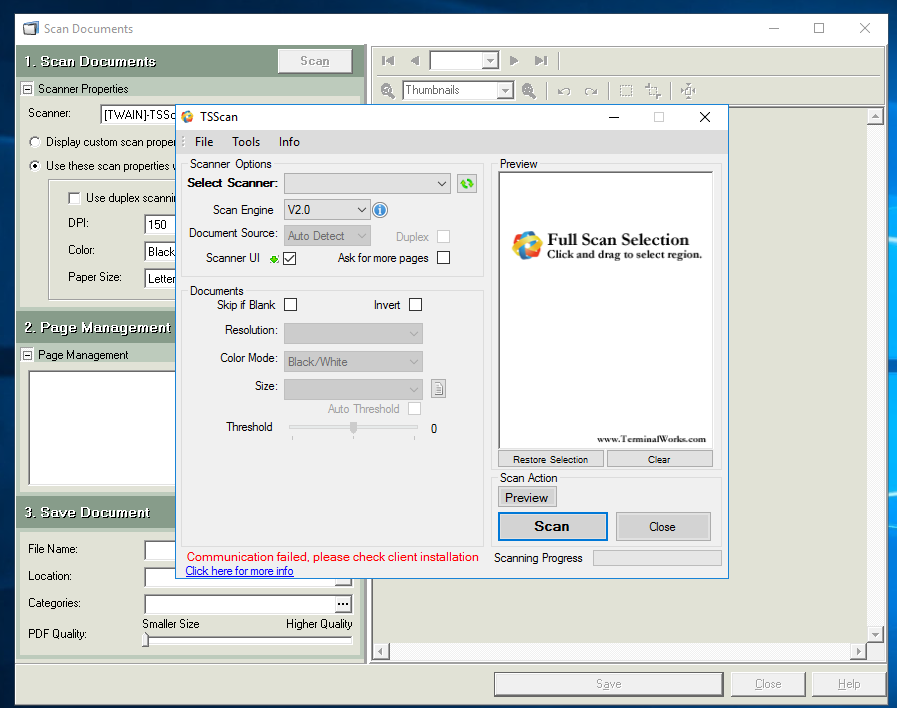
How to use TSScan in Document Management System (DMS) in Rightworks:
- Select the Scan icon in DMS.
- Under Scanner Properties, for Scanner select TWAIN-TSScan.
- After choosing any other preferences you may need, select Scan.
- In the TSScan window, choose the scanner and preferences you wish to use.
- Select Scan.
Fujitsu ScanSnap:
Fujitsu ScanSnap is only supported in the Windows version of TSScan. It does not have a true twain compliant driver and instead uses Fujitsu's own driver. In order to scan successfully, the ScanSnap Manager needs to be installed and running on the local computer. In the TSScan window, for Scan engine select either V2.0 or V2.5.
How to scan to the hosted environment without using an application:
You won't see an icon for your scanner on your hosted desktop. That doesn't mean your scanner isn't connected, but if you need to scan without using a specific application to pull the scan into you'll need a TSScan shortcut.
You can scan locally, and then copy and paste into the hosted environment if wanted. You can use Ctrl+V (keyboard shortcuts work by default in the hosted environment when it's maximized) or select the Home tab in File Explorer and use the Paste button.
If you want the TSScan icon installed on your hosted desktop, contact support.
For more information on how to contact Lacerte, as well as our operating hours, see here.
For more information on how to contact ProSeries, as well as our operating hours, see here.
Troubleshooting scanning issues:
- If you cannot scan, check to make sure you can scan locally. Your scanner might have not have power, the connection might be loose, or you might have an error displaying on your scanner.
- Make sure you have a twain compliant scanner driver installed locally for your scanner. If you need assistance with this, please contact your local IT or the company who makes your scanner for support.
- For Fujitsu ScanSnap, make sure the ScanSnap Manager is running locally and that you are using Scan engine V2.0 or V2.5.
- Uninstall/reinstall the TSScan Client.
- Check your hosted shortcut's configuration to ensure that it is set to see local scanners.
How to uninstall/reinstall the TSScan Client:
The TSScan Client can be uninstalled from your local computer just like other programs. The steps included to uninstall TSScan Client are just one method of uninstalling.
- Double-click the red Logoff button to sign out of the hosted environment and end other remote sessions if open.
- If you are missing this icon, right-click on the Start/Windows icon, select Shut down or sign out,and choose Sign out.
- Click on the Start/Windows icon in the lower left of your local screen.
- Type uninstall and select the Add or remove programs choice it finds for System settings.
- Select TSScan Client.
- Choose Uninstall.
- Go to the TerminalWorks TSScan download page.
- Select Download Client.
- Mac users will first need to select the appropriate choice from the dropdown.
- Run the downloaded TSScan_client.exe and follow the prompts to install.
- Sign back in to the hosted environment and test scanning again.
How to check the remote desktop connection scanning configuration:
The setup wizard used to set up access to the hosted environment creates the shortcut to access the hosted environment with the Other supported Plug and Play (PnP) devices box checked to allow the environment to communicate with local scanners.
If you edited your shortcut to access the hosted environment, or manually configured it, you may have unchecked Other supported Plug and Play (PnP) devices. Follow these steps to check the configuration and change it if needed:
- Right-click your shortcut to access the hosted environment and select Edit.
- Windows 11 users will need to select Show more options first to see Edit.
- Select the Local Resources tab.
- Select the More button under Local devices and resources.
- Look to see if Other supported Plug and Play (PnP) devices is checked.
- If it is already checked, you can select the x to close out of the window.
- If it is unchecked:
- Select Other supported Plug and Play (PnP) devices.
- Return to the General tab, and select Save.
- No confirmation will appear. Once this is done you can select the x to close out of the window.
- Close out of the hosted environment then re-enter to start a new session using this new configuration.
